Fun With A Vintage Lens On Your Digital Camera
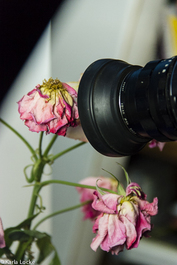
I’m not sure how or when it started, but I have acquired a collection of vintage 35mm lenses, along with several film bodies and a Mamiya 645 medium format film camera with three large lenses. It started when friends and acquaintances had no idea what to do with their old cameras. Some would ask me to list them on eBay or Craigslist, others would just give them to me (mostly to just get rid of them without the guilt of throwing them away), telling me to either sell or just get rid of them. I kept a couple of the older, unique cameras. They’re not worth much today but they are fun to have. I also kept some of the unique vintage lens. Unique, in that they are very sharp, and 100% metal. All have a manual focus and a manual setting of aperture. My current collection consists of; two Leica lens – a 50mm f2 and a 400mm f4.5, three Pentax lens – 35mm f2.8, 50mm f1.4 and 75mm-235mm f4 zoom. My body is a Canon DSLR, this means I need an adaptor ring to use the older lens. Each manufacture or lens model will require a specific adaptor ring. The two Leicas, each have a different original mount, which requires a specific adaptor. While the Pentax has the same mount, so I can share one ring amongst them. Attaching an adaptor ring to a lens allows it to mount to a DSLR. When searching Amazon & eBay, type in the keywords of the lens manufacture, what type of camera body you would like it to fit, followed by ‘adaptor ring.’ There are several manufactures with prices as low as $2 or $3 up to $250 or more. I generally aim for something in the middle. I have had very good luck around the $10 range, even knowing it may be a hit or miss scenario. But that is part of the fun challenge. The problems to avoid with the cheap ones is–reliability. No one wants an adaptor ring falling apart, allowing gravity to suck the lens down to the ground. Or worse yet, the ring jammed so tight, it can’t be removed. If it is stuck to the lens, that’s not too bad, but if stuck to the camera, it could cause some damage and/or be expensive to remove. When trying out a new adaptor ring, to test it, I will attach an extension tube to the vintage lens first. I would rather sacrifice an Extension Tube than a camera body if the adaptor ring is bad. I wiggle both sides, checking for tightness, looking for gaps that may produce light leaks, then take them all apart. I then repeat this process a couple more time, inspecting the ring after each fitting. Some things to be aware of As the lens was originally designed many years ago for a specific model(s) of cameras there will be some differences from what was the distance from the lens exit to the camera’s film plane originally, to what is now the distance to your sensor. Adding a thin adaptor ring adds to that distance too. Also, though not as important, older lens were designed for 35mm film, which is fine if you are shooting with a “full-frame” sensor, but when shooting with an APS-C sensor it will have the the same “crop-factor” as any of today’s lens. You will also find most vintage lens will not focus to infinity on your DSLR. It is that “lens exit to sensor distance thing.” Not usually a big issue, just one I have learned to live with. If needed, I experiment and found I am able to focus just short of infinity and set the aperture to f20 or so. There are two other “fun factors” you encounter while shooting with vintage lenses; 1) Learning how well you can actually focus on your own, after being spoiled with Auto-Focus. Also, many older cameras had a focus-screen or split-screen in the viewfinder that aided in focusing. You will not have that now. 2) Learning to work with and/or remember to set the aperture before tripping the shutter. Your depth-of-field and/or exposures will be wrong if you don’t. The trick is simple. For focus make sure the Diopter adjustment on your viewfinder is set. It is a very small wheel, just to the side of the viewfinder, which adjusts the viewfinder optics to your eyesight. Using a standard auto-focus lens, have the camera focus on a subject, then slowly adjust the Diopter wheel until that item looks tack sharp to your eye. Make sure you don’t bump it afterwards, as you will no longer be able to do a manual focus. I’ve just learned to remember my setting is “4-clicks” counterclockwise from the stop. Now, practice manually focusing with your vintage lens. For aperture settings and metering, set you camera to Aperture Priority. Leave the aperture wide open while you focus, allowing you to see more light. Then, before shooting, rotate the aperture ring to the desired setting. The camera’s meter will adjust itself for the amount of light available with that aperture setting. There are several models that include a Focus Confirm Chip, not to be confused with true Autofocus. They help activate the “Focus Points” you normally use, except now you have to move the focus ring yourself. I have heard good things on a few of them, but have never tried them myself. I could see how that could be handy, but I have learned how to rely on the old fashion way of focusing through the viewfinder. 
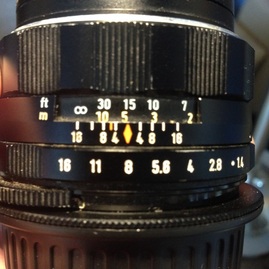
Most vintage lenses include brightly painted focus marks and equally bright aperture settings on the barrel. Makes them look “cool.” Learn to use them to speed things up. It is how it was done “in the ole’ days.”
The Zone Focus technique allows you to prefocus and preset the aperture. Great for street photography. Here is my technique, try it then adapt for yourself. First, adjust the focus ring, using the focus marks on the lens to quesstimate your zone, for example 15ft. Make sure you are using the foot markings and not the metric if you are in the U.S. Next, set the aperture ring to say f8 or f11. Now, via the DOF scale, as you can see on this Pentax 50mm f1.4, DOF will be from 10ft away to about 30ft at f8. Going to f11 will increase that DOF from about 8ft to about 35ft, but at the same time, require twice the shutter speed, which is fine if you have enough light. As usual, make sure to keep an eye on the shutter speed to make sure they are fast enough, i.e. 1/50th or faster for a 50mm lens, to still be hand-holdable with out motion. Learn the “rules,” learn which rules can be broken and what happens. Learn how far you can push the “boundaries,” and keep experimenting.
0 Comments
Your comment will be posted after it is approved.
Leave a Reply. |
AuthorPhotography and photographers... A look at both. Blame it on the light. Archives
June 2017
Categories
All
|
 RSS Feed