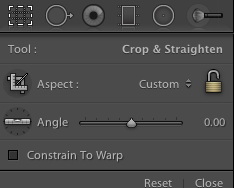
 …Here are a few of my favorite Lightroom Tricks. Some may be new to you. Some you may have forgotten. Let us explore the Crop Tool today–keyboard shortcut “R”. If you would like to do a quick crop of an image, simply hit the R key (even if in Grid View) and the image will be brought to the Develop Module and the Crop Tool will be selected. When you are done, hit the G key to go back to the Grid View in the Library Module, or the E key to go back to Loupe View. Lightroom provides six different crop overlays for you to use as Composition Guides… If you are tired of the basic “one-thirds” grid that shows when you select the Crop Tool (R key), you can access the other overlays by hitting the O key to toggle through all six. Some of the “Composition Guidelines” you will recognize, others…well, they are interesting to try. Would you like to crop a vertical out of a horizontal image, or visa versa? Rotate the crop tool by hitting the X key. You can simply click on any corner of the Crop Overlay and drag it as needed. If you would like to do a Freehand Crop, click on the Padlock to the right. Also to the right of the Aspect Tool, you’ll see a Drop-down menu, which probably says “Original” right now. Inside it are a large range of standard crop aspect ratios to chose from, including a few video ratios too. Choose one, then grab the corners of the Crop Overlay to resize as desired. Click on the image to move it around inside the Crop Overlay. Would you like a Pseudo Panoramic? Chose the 16:9 or 16:10 ratio. These two will also fill your large TV screen. If you would like to have a Custom Crop Size, say for an existing frame you’d like to reuse, choose the “Enter Custom…” option, then enter in the dimensions you would like. Did you lean a bit while shooting? You have three options to correct that. 1) Hover your mouse near one of the Crop Overlay corners, it will turn into a curve with double arrows. Click and drag the image until it lines up with the grid that is now visible. 2) Click and drag the slider to the right of the “Angle Tool” or 3) Click on the “Angle Tool”, move your mouse over the image and drag a line along some part of the image that should be perfectly horizontal or vertical, and release. Your image will now automagically level itself. When you are all done, click on Close, or hit the G key to back to Grid View in the Library. Made a mistake? Click on Reset. Repeat the above steps as necessary. Are you cropping a large amount of scanned slides or negatives? Do them in a batch; Click on Comm/A or Ctrl/A, or you can go to “Edit > Select All” — At the bottom of the Develop Module Tab, there are two buttons, “Auto-Sync & Reset.” If yours show “Sync” instead of “Auto-Sync,” click on the little switch inside the button to toggle it. I’ll explain the “Sync” function another day — Now, you are able crop all of the images at once, which for slides is great, as they are all the same size. Drag the Crop Tool corners to just inside the image frame and hit Close. Lightroom will automagically crop all images to match the one you just cropped. Extra Trick #1 — While you have all those images selected — I also click on Auto Tone and Auto White Balance, as this will quickly get all of the images very close to what I’d like, then tweak as needed from there. I know, there are many out there, that think using the Auto Buttons is being lazy, that you should do all the settings by hand… Well, I’m not being lazy, I’m being efficient. There are thousands of folks at Adobe, who have put a lot of hours into making just those two Auto Buttons alone, so that they work as perfectly as possible… I’d say it gets it right at least 96.82% of the time, unless there’s something really tricky in an image, like night shots or sunsets, then I’ll tweak as needed. So Use It! Keep Those Adobe Folks Employed! Extra Trick #2 —An little known quirk about Lightroom, which is actually handy, but frustrating too — When you have all images in a folder selected — While looking at the Film Strip tab across the bottom, if you click on the center of an image, that image will appear in the main screen, but all images are still selected for batch processing. If you click on the frame around the image, that image will be selected, but all others will be de-selected. So, click carefully.
0 Comments
|
AuthorPhotography and photographers... A look at both. Blame it on the light. Archives
June 2017
Categories
All
|
 RSS Feed